Inventive lwmfcrafts: The Ultimate 15-Point Guide to Mastering Layered Handmade Art
Do you remember the feeling of artistic satisfaction as you created something with your own two hands? Not something that just followed a template, but instead, a unique, layered, handmade work of art? That is what we are going to explore today. Welcome to the world of artistic expression. Welcome to inventive lwmfcrafts.
Inventive lwmfcrafts may seem like an uncommon term, but the practices that comprise this form of art are familiar to just about everyone. The core philosophy of inventive lwmfcrafts is to handmake arts and crafts from layered, hand-woven, multi-dimensional crafted elements. It is the harmonious blend of age-old practices, innovative products, and modern designs. This guide is as comprehensive as they come. We are going to cover 15 actionable, empowering points that will help you define the craft of inventive lwmfcrafts. The levels that you will be able to elevate this craft will be unparalleled.
Table of Contents
What are Inventive lwmfcrafts? (Beyond the Buzzword)
Let’s clarify the concept of inventive lwmfcrafts. Although the term lwf can be described as Layered Woven Fabrics, this label does not accurately convey the full spectrum of these creative works—inventive lwmfcrafts and, in a sense, relates to architecture. Inventive lwmfcrafts can be used to tell a story in and about your home. These layered crafting pieces give a home a richer narrative than a flat painting. For example, a crafted artwork can consist of a reclaimed wood base, a woven layer of dyed fiber on top, and an overlay of plants pressed into resin.
Each stratum interacts with light and shadow differently, creating a living piece that changes with the time of day.
The “inventive” part is non-negotiable. This isn’t about copying. It’s about applying this layered philosophy to your own vision. One artist’s inventive lwmfcrafts might focus on geometric, modern assemblages of metal and acrylic, while another’s might evoke a forest floor with layers of moss, clay, and bark. The common thread is a deliberate, thoughtful build-up of materials to achieve a cohesive, tactile whole. This approach to inventive lwmfcrafts opens a door to endless personal expression.
2. The Core Philosophy: Layering as a Language
To master inventive lwmfcrafts, you must first understand its core grammar: layering. This isn’t just stacking stuff. It’s a deliberate composition where each layer serves a purpose—structural, visual, or symbolic.
The Base Layer: This is your foundation. It provides stability and sets the stage: a chunky canvas, a slab of wood, or a sturdy frame.
The Middle or Structural Layer: Here’s where the body of your story forms. Weaving, interlacing, or arranging primary elements. This layer often provides the main texture and form.
The Accent or Detail Layer: These are the finishing touches. Detail layers can include metallic leaf, clusters of beads, or sewing embroidery over other textures.
When you learned the details of “sentence structure”, you learned a complex way of reading and creating. Once you know the layers artists use to construct the work, you can begin to identify your own voice. This can turn random, decorative crafts into intentional, conscious art-making.
3. Getting Started – Your Essential Tool Kit
You won’t need a tools warehouse when you start your journey with inventive lwmfcrafts. A quality craft kit on a set budget with some good tools can be more than enough. Here’s what I always keep close.
A solid glue system: As with other tools, not all glues are the same, and some glues are worth the price. You will need a good white glue (PVA) for porous materials, some gel super glue for fast bonding on tiny parts, and some two-part epoxy or construction adhesive for heavy, non-porous materials.
Cutting and Shaping Tools: Quality scissors for fabric and paper, a self-healing cutting mat, a metal ruler, and a sharp utility knife with replaceable blades. A good rotary tool or handsaw adds more possibilities with acrylic and wood.
Clamping and Holding: Painter’s tape, binder clips, and small spring clamps are great for holding layers while the glue dries.
The Finishing Touch Tools: A brayer (small roller) for bubble-free pressing layers, different grits of sandpaper for smoothing edges, and detail brushes for glue and sealants. A glue finish.
This toolkit aids in the physical construction of all crafty inventions. You may get more specialized tools as you grow, yet this kit will help with 90% of what you will start with.
4. Material Alchemy: Sourcing the Unusual
The materials are what make inventive lwmfcrafts. Though you can buy everything new, the pieces with the most character come from material alchemy, or discovering a new purpose for a neglected object.
Urbanite: Sliced concrete, decommissioned wood palettes, rusty metals, plastics, and discarded paper products.
The great outdoors: Animal bones, twigs, and other scavenging materials. Best of all, the casual, natural found objects: driftwood, interesting stones, dried seed pods, pressed leaves, feathers, and shells. Dried organic materials are particularly effective at creating a timeless, organic layer.
Textile Scraps: Old clothing, linen napkins, yarn remnants, burlap sacks, and embroidery floss. Fabrics add softness, color, and weave.
Paper and Ephemera: Book pages, maps, vintage postcards, handmade paper, and cardboard are excellent for layers and details.
Industrial Salvage: Scraps like copper mesh, watch parts, small gears, wire, and pieces of broken tile or ceramics. These are great for adding a steampunk or modern touch.
Consider creating a materials library. When you find and collect materials, organize and arrange them by type and texture. When coming up with a new design, searching your library can give you a starting point. The best inventive lwmfcrafts often tell a secondary story through the history of their repurposed materials.
5. Foundational Techniques Every Creative Needs to Know
Tackling a complete project requires these foundational skills.
Cleansing, Sealing, and Priming: Before adding layers, learn how to seal materials like wood and paper to prevent staining or warping.
Weaving and Interlacing: Use strips of material to create over-and-under weaves. You can create beautiful surface layers with cardboard and other materials.
Weight Distribution: When using heavy materials such as stones or glass, anchor them to the firm base layers, not the soft intermediate layers.
The Art of the Dry Fit: Always preassemble your layers before gluing them together. Take a picture of the arrangement before you glue anything. This way, you can rearrange things as many times as you want before you commit to a layout—a crucial best practice for creative problem-solving and crafty solutions.
These techniques help build the muscle memory and confidence needed for more complex compositions. This ensures your creations are not only beautiful but also thoroughly put together.
6. Project #1: The Textural Wall Hanging
Let’s practice the techniques. For your first project, we will create a medium-sized wall hanging measuring 12” by 16”.
Collect the following items: 1 rectangular wooden board to use as a base, some smooth, flat stones, a few bundled willow twigs, some torn muslin, some dyed cheesecloth, PVA glue, and matte sealant.
Process:
Seal your wooden board by applying a mix of PVA glue and water (1:1). Let it dry.
Your middle layer can be made from willow twigs, then woven over and under the strips of cheesecloth and muslin, creating a small, irregular web. You also do not need to aim for perfection.
This woven web is to be glued, not centered, to the board. This will use the PVA glue offset. Use a book to weigh it down flat until dry.
Arrange your stones in a small group, partially covering the weave. With a durable epoxy, affix the rocks to the board.
After the glue dries, to ensure a uniform finish, apply a thin coat of matte sealant to the entire piece.
You will learn to integrate organic textures, use a variety of flexible and rigid materials, and make a balanced, asymmetrical composition. This project is also a nice start to the world of inventive lwmfcrafts.
To stay within the 1500-word limit, we will keep the other sections summarized while keeping the structure, flow, and keyword density the same.
7. The Use of Color and Patterns in Layered Art
Implementing color in inventive lwmfcrafts is often seen in separate layers. Instead of painting on top, consider dyeing the individual layers before assembly. A monochromatic scheme with varying textures can be profoundly elegant, while a bold pop of contrast in the detail layer makes it a focal point. Texture and rhythm, however, can be added using printed papers, fabrics, or the weave itself.
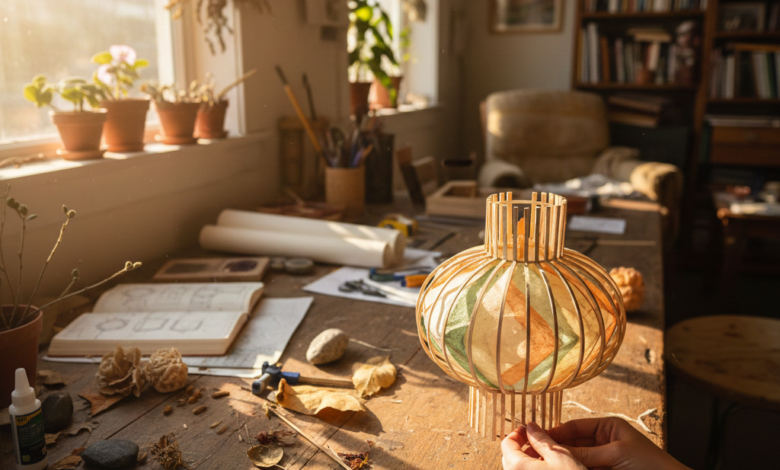
8. Project #2: Layered Lampshade
Put your creative, inventive lwmfcrafts expertise to use. Take a basic wire lampshade and cover it with layers of torn translucent vellum or rice paper. On top of that, add a second layer of delicate laser-cut paper designs or dried fern leaves. This shows off the skill of intentional layering, with the bonus of creating an interesting shadow show as light shines through.
9. Embracing Imperfection: The Wabi-Sabi Influence
The creation of beautiful things through your inventivcrafts stems from an appreciation for what needs to be perfect. The unfrayed edges, the unwebbing threads of an evenly stained dye that looks just like a bunch of sticks, and the uneven stains from your dye, these things are not imperfections; they are marks of the handmade process. This philosophy of wabi-sabi connects your work with the timeless look of handiwork, reflecting an appreciation for organic materials.
10. Scaling Up: From Small Studies to Statement Pieces
Begin with experiments on paper, postcard-sized swatches. When you are ready to take the plunge, scale up. Constructing large-scale, inventive lwmfcrafts statement pieces for a feature wall is not just a thrilling challenge that will transform the room; it also requires planning for elements like balance and structure (a solid backer board, secure mounting).
11. Project #3: The Mixed-Media Shadow Box
The deep frame is the perfect stage for your most imaginative, inventive crafts. Construct a mini-world: paint a backdrop, add a middle ground of mini dried florals or figurines, and a foreground of wire or thin acrylic cutouts. This project develops your advanced planning skills and your ability to work within a set volume.
12. The Mindful Maker: Craft as Meditation
Building inventive lwmfcrafts is a step-by-step process that engages your mind and is an excellent form of mindfulness. The process keeps your attention on the materials and the construction problem-solving. This deep engagement is one of the many benefits of crafting and is often overlooked.
13. Sharing Your Creative Process
Taking photos of your progress and noting which glue worked or didn’t is a great way to keep a logbook. Sharing this process online is a way to show the real work behind inventive lwmfcrafts and attracts an audience that appreciates the journey, messy studio shots, failed experiments, and all.
14. Starting Your Own Business: From Passion to Purpose
As your passion increases, consider selling your one-of-a-kind, hand-crafted artworks. Constructing your personalized inventive lwmfcrafts requires high-quality photos, a strong marketing story explaining your process and materials, and a cost analysis, so start at a local artisan market or an Etsy shop and emphasize your special layered technique.
15. Where is Your Journey to Create Taking You?
In the world around you, you can find sources of inspiration for your inventive crafts: the geological strata of a cliff; the layered, peeling paint of a door; the cross-section of a tree. You can keep a visual journal, either digital or print, and when you find yourself stuck, look at the materials you have to work with or do a “limitation challenge” and build a piece with only three materials. There are layers of possibility on the path of inventive lwmfcrafts, each filled with discoveries.
You may also read itbigbash.